Creality Cr 10 S5 Heated Bed Upgrade
Creality CR-10/s is ane of the almost popular and affordable 3d printers. It has one main disadvantage though – its original Melzi command lath has express memory and onboard stepper drivers. These limitations make incommunicable to experiment with fancy firmware features (Marlin) or to benefit from the latest stepper driver engineering.
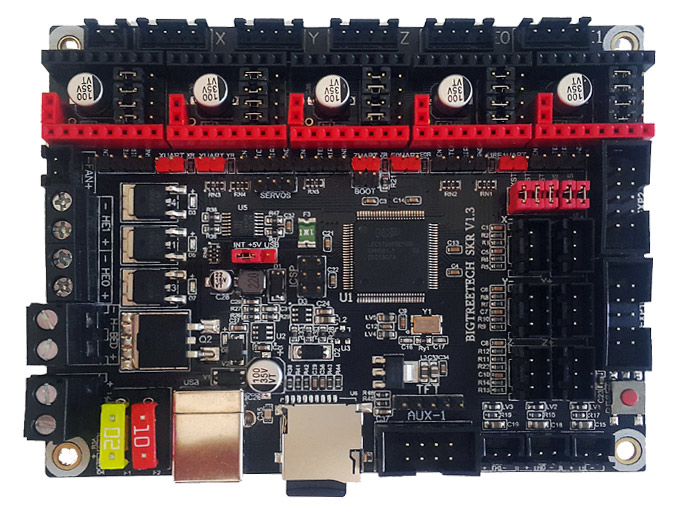
This instructable is for upgrading the command lath with a 32-fleck SKR V1.3 lath from BigTreeTech. I focus on the wiring, the serial link drivers control (UART) and the basic configuration of Marlin 2.0.
Why a 32bit control board?
Why not? It has groovy processing power, assuring polish movement at loftier printing speed (if your mechanics allow it). The price is not an issue anymore – there are 32bit boards for $thirteen nowadays – like the SKR Mini.
For my upgrade I selected the SKR V1.3. The board sells for around $20 and comes with 100 MHz processor, possibility to connect upwards to five drivers (2 extruders), information technology is BLtouch prepare and is supported by the new 32bit version of Marlin.
For the stepper drivers I'll be using the TMC2208 V3 silent stepsticks, however yous may expect first at the all new TMC2209, which provide additional features and higher current.
Sold standalone or in kit with stepper drivers.
Command board replacement – the wiring
Wiring the SKR V1.iii is fairly easy using the standard wires and connectors inside the CR-10 control box. I yous desire to have a forced ventilation for the stepper drivers (recomended), you lot tin connect a fan on the 12 5 pins – check the video. The CR10 board has one more connector for the heatbreak heatsink fan – for the SKR V1.iii apply the chief 12 5 connector for this purpose.
Fix your board and drivers to run in UART mode
One of the master adventages of the latest TMC 2208/2209 stepper drivers is that they support both the standard STP/DIR control and serial link (UART) control. UART has many advantages, for example the commuter current can exist set directly in the firmware – no need to play with the VREF potentiometer. However, both the board and the drivers have to be prepared to run in UART.
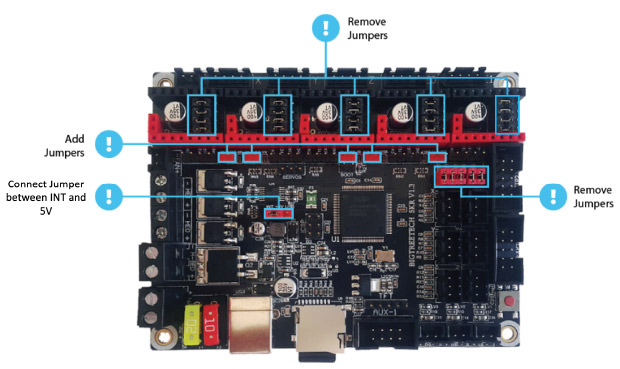
- Remove the iv jumpers from beneath the drivers on all boards
- Put unmarried jumper for each driver'due south UART connection
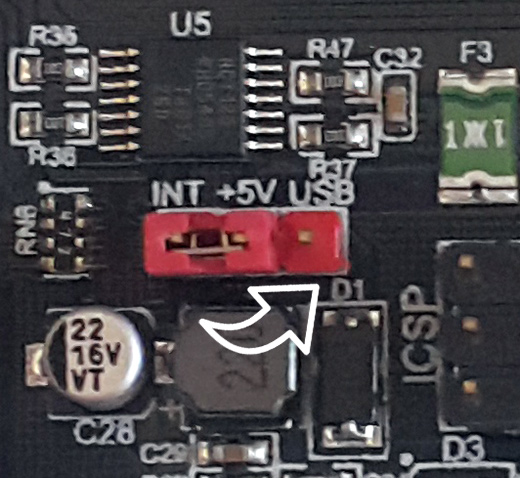
- Make sure power jumper is between INT and +5V (should be default from manufacturing plant). If this is not installed correctly yous may have power issues with your Raspberry Pi which can cause throttling.
Connect SKR V1.three to your PC
In guild to load a firmware to the SKR V1.iii the easiest fashion is to conect it to your PC with the supplied USB cable.
Afterward succesful connectedness the contents of the 128MB onboard SD card volition evidence. There is only i file – FIRMWARE.CUR, a firmware file that has to exist overwritten with a customized firmware for your printer.
Marlin two.0 firmware – basic configuration
The SKR V1.three 32bit board works with the new 32bit version of Marlin two.0 and with Smoothieware. Being happy with Marlin then far I volition be sticking with it. There are different means to configure and compile the firmware. I utilise Atom and platformio-IDE. Atom is avant-garde text editor supporting rich functionality through plugins. Platformio-ide is a plugin for Arom used to compile the firmware. All yous need is to download and install Atom editor. Run it and install platformio-IDE from File > Settings > Install > Search Package (type Platformio-IDE). Atom volition guide you lot also for the installation of boosted required components (like Clang and Git).
Next step – download Marlin.
What Marlin source to kickoff with? Although BigTreeTech (the manufacturer of SKR boards) has a repository on github with a version of Marlin 2.0, I preffer to start fresh with the newest version of Marlin 2 ( bugfix-ii.0.ten ). It assures to have the latest bugfixes and supported hardware.
Excerpt the files and add the extracted folder in Cantlet (File>Add together Projection Binder).
If you take previousely set Marlin for your printer, become your old Configuration.h and Configuration_adv.h files in gild to use the specific settings for your printer similar the PID values for your hotend and heated bed.
Y'all will have to edit 3 files:
- platformio.ini – to set the platform environment (LPC1768 for the SKR V1.3);
- Configuration.h – stepper drivers type, display, specific for the printer parameters;
- Configuration_adv.h – advanced features for the drivers.
Installation of the SKR board
in the CR10 control box
As we saw already the wiring of the SKR, using the default connections in the control board is easy. Fixing the board inside isn't, because the SKR and the stock board have different layout and holes for the fixing screws. Once over again the Thingiverse community had a solution and saved me time to design my own. I printed this adapter accessory that comes with 40mm drivers cooling fan holder.
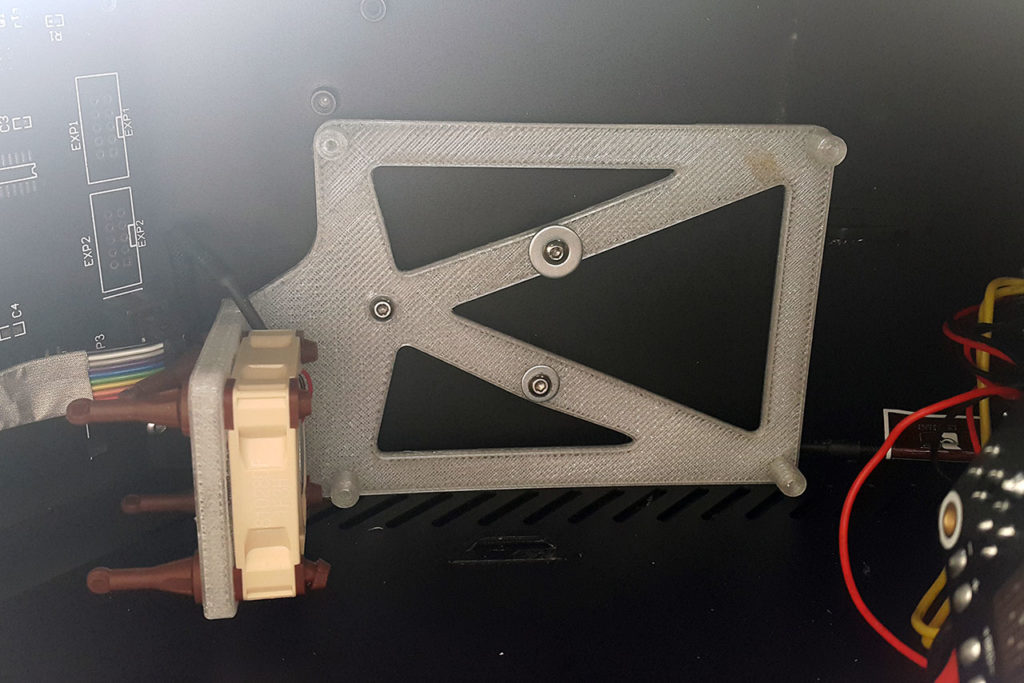
I used a silent Noctua 40mm fan for cooling the drivers.

Final thoughts
My CR10 runs silent. Information technology was not bad upgrade and totally worths the $50 (lath and 5 TMC 2208 drivers bought on Amazon). You lot can find cheaper prices on Aliexpress if you can afford the expect.
The TMC2208 silent stepsticks are great and relatively chep drivers for XYZ. On the extruder nevertheless I intend to replace the driver with the new TMC2209, because of its college current and linear accelerate support (for some reason I couldn't become it to work reliably on the TMC2208).
Although this upgrade was performed on Creality CR-x, the process is very similar for CR-10s and Ender 3 3d printers. Delight note that I didn't activate the onboard SD card, because I use Octoprint. If you need the SD bill of fare yous have to either utilize a TF to SD menu extention cable or to upgrade the display for ane that has an integrated SD card reader.
Creality Cr 10 S5 Heated Bed Upgrade
Posted by: nathaliewonsession1954.blogspot.com


Comments
Post a Comment